The 11 Tools You Need To Know To Start Designing in Adobe Illustrator Today

Before We start
About Adobe Illustrator
This is by far my FAVORITE design program. A lot of people don’t know this (which is completely understandable) that Adobe Illustrator is a Vector-based program
What does Vector mean? It means that anything you create can be scaled up and down infinitely without your design losing its quality.
Before I bore you even more with all the benefits this program has to offer, you can check out my other blog post: Illustrator vs Photoshop - Top Reasons You Should Invest In Adobe Illustrator Today When Branding For Your Business
Download Adobe Illustrator
… let’s download it! (click here to start your 7-day free trial of Adobe Illustrator)
“But Kiki, why would I pay for Adobe Illustrator when I can use Canva for free?”
I hear this often. Many people do not want to commit to paying a monthly fee for Adobe Illustrator when they can just use Canva for free.
I get it! HOWEVER, the sky is the limit with what you can create in Adobe Illustrator vs. Canva.
In Canva, you are VERY LIMITED with the free version and a lot of people use the same design templates! The whole point of designing what you want is to stand out, right?
You can start with a 7-day free trial of Adobe Illustrator, and after this tutorial, if you decide you want to keep it, you can continue to pay the subscription each month.
Now, I have to be honest, the above link is an affiliate link but it’s cool because the more support I get from you by purchasing through this link, then the more time I’ll have to deliver some awesome free knowledge your way.
It's a win-win!
If you already have Illustrator downloaded… let’s make sure we’re using the same settings
I'm going to open my program with the factory settings by holding down
SHIFT > CONTROL > OPTION > COMMAND on my mac.
Hold down all 4 buttons at the same time > THEN > (keep holding them) as you click to open Adobe Illustrator, so we are all looking at the same tools.
Create your document
Click CREATE NEW and set the document to whichever size you would like.
Note: CMYK is for Print and RGB is for web documents. So if you plan on printing this flyer, card, resume, etc. set the document to CMYK. If this design you’re creating is for web purposes, like the header of your Facebook page for example, then you will want to set this document to RGB.

Check your settings
go to WINDOW > and check CONTROL to make sure it's on.
Got to WINDOW > TOOLBARS > and make sure ADVANCED is selected.
the 11 top tools
The toolbar panel on the left
Now, here are the top tools were going to learn about (from top to bottom on the toolbar):
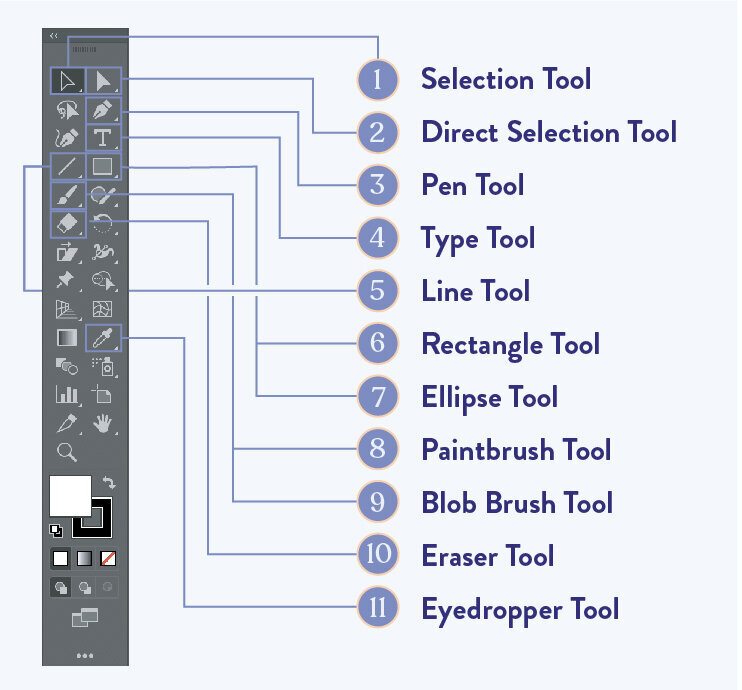
1.) Selection Tool - This allows you to click on specific shapes and objects
2.) Direct Selection Tool - This allows you to click on anchor points that make up specific shapes and objects.
3.) The Pen Tool - This may be THE MOST USED TOOL by designers. You use the pen tool to create your shapes and lines. By clicking with the pen tool, you create anchor points, by clicking and dragging you're able to make curved anchor points.
It takes a little practice...This is an awesome website you can use to learn how to master the pen tool: I highly recommend using this so you can get comfortable. https://bezier.method.ac/
4.) The Type Tool - You can use this to type whatever you want in any font you want! Click and draw to start a text box, and then go to the Character panel on the right to change the font size and style.
5.) The Line Tool - Use this tool by clicking and dragging to create lines
(This is a fairly simple tool to understand).
6.) The Rectangle Tool - Click and drag to create perfect squares and rectangles. You can hold the shift key as you click and drag to make the shape proportionately into a circle
7.) The Ellipse Tool - Click and drag to create perfect circles and ellipses. You can hold the shift key as you click and drag to make the shape proportionately into a circle
8.) Paintbrush Tool - Paints like a brush but creates brushstrokes that have anchor points like the pen tool. The difference between this and the pen tool is that you do not need to click to create anchor points. With the Paintbrush Tool, you click and drag to create the stroke/line.
9.) Blob Brush Tool - Instead of painting with a stroke and creating lines like you do with the Paintbrush Tool, with the Blob Brush Tool you paint and create shapes with a Fill instead of a Stroke.
10.) Eraser Tool - This helps you to erase any lines or shapes you would like.
11.) The Eyedropper Tool - Select a color of a pixel! Keep in mind that this is not always 100% accurate unless you're zoomed-in and selecting the pixel color you want. But this is a great way to create a color palette, by importing an image you like and selecting the colors from it.

Panels to the right
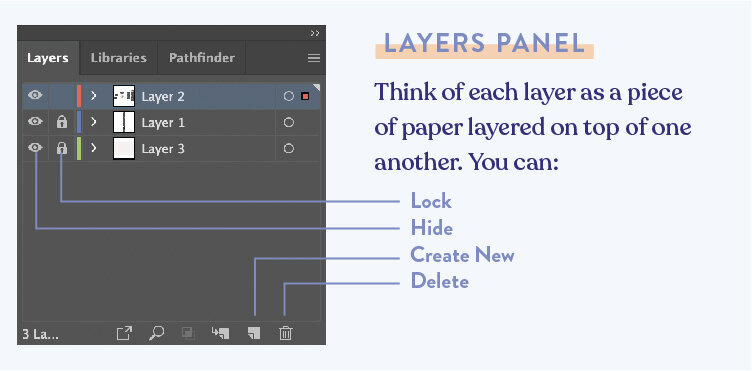
1.) Layers - Think of each layer as a piece of paper layered on top of one another
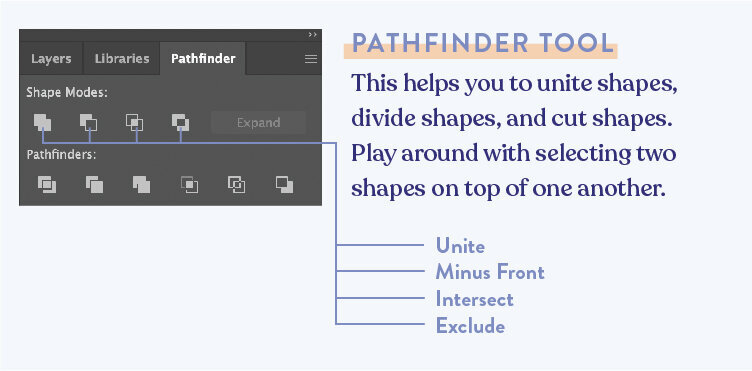
2.) Pathfinder - This helps you to unite shapes, divide shapes, and cut shapes. Play around with selecting two shapes on top of one another.
3.) Properties - This panel is like an "overview" of different options to change what you have selected. Currently it shows there is nothing selected.
Think of this panel as a “Quick Links” or “Quick Tools” area. All the main edits you need to make in one panel when you have objects selected.

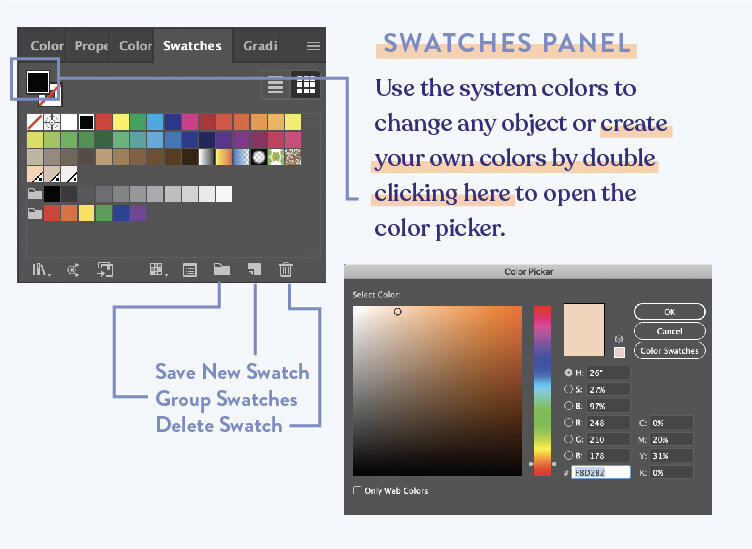
4.) Swatches - Changes the colors of your type, shapes, and objects. Use the system colors to change any object or create your own colors by double clicking the fill to open the color picker.
5.) Character - Change fonts, size of fonts, the weight of fonts, and the spacing of letters. You can do uppercase, lowercase, strikethrough and much more…

6.) Align - You can align a single object and/or multiple objects to:
Align to Selection
Align to Key Object
Align to Artboard
For Key Object - Select your objects and then click on the one object from the group that you would like the other objects to align to.


7.) Stroke - Settings specifically for the stroke of a shape, object or line.
Weight - Change the weight/thickness of your stroke
Caps - Change the end shape of the stroke/line
Corners - Change the corners of the shape, object or line
Align Stroke - Align stroke to the center, outside or inside of the shape or object
Dashed Line - Turn your stroke into a dashed line
Arrowhead - Add an arrowhead or other option to the start or end of a line.

Keyboard commands you need to know
1.) Undo - Command + Z
2.) Redo - Shift + Command + Z
3.) Cut - Command + X
4.) Copy - Command + C
5.) Paste - Command + V
6.) Paste in place - Shift + Command + V
7.) Shift - Scale anything up and down proportionately
8.) Spacebar - hold this down and click and drag to move around the artboard
9.) Zoom in - Command + =
10.) Zoom out - Command + -
11.) Increase Size of Blob Brush and Eraser tool - ] (right square bracket)
12.) Decrease Size of Blob Brush and Eraser tool - [ (left square bracket)
13.) Duplicate Object - Option (while holding) click and drag the object
(hold shift as well to keep it in the same x-axis or y-axis)
And if you ever need more practice, here is a fun tool that will visually show you the key commands on the keyboard. You can also interact with the keyboard to show different settings.
Check it out here: http://waldobronchart.github.io/ShortcutMapper/?utm_source=zapier.com&utm_medium=referral&utm_campaign=zapier#AdobeIllustrator
Another key “tool”
This may not be a "tool" but I believe this is important to know if you're going to create your own templates or graphics for your business.
File > Place - allows you to place any image you want into Illustrator.
Keep in mind that Adobe Illustrator recognizes this image as a "link" so if the image is ever deleted or moved from your computer, Adobe Illustrator will have a hard time finding it.
Conclusion
There is always more and more to learn in this program. I hope this tutorial was able to get you started and make it feel as if Adobe Illustrator is a little less confusing.
The best advice I can give is to explore and play around with everything we talked about today. Once you get more comfortable, you can continue to explore and learn more.
As always, I'm here to help you with any brand design related question or problem you may have.
Feel free to comment below or get in touch here.
Until next time my EyeSavvy Guru!